|
Crater Crazy
Make yourself looney by viewing craters and even making your own.
by Andrea Gianopoulos

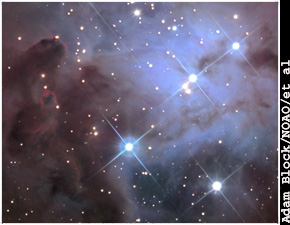
Copernicus is a complex, young crater on the northern
hemisphere of the moon.
Lick Observatory
| | Imagine yourself in medieval Britain on a peaceful, warm summers evening in the late
12th century. Frogs sing their nightly tunes while gnats hover about your head. As you swat them from your face, the moon, just a few days past new, comes into view. What a fine night. Then, in a sudden flash, the moons waxing crescent appears to split in two. Is the world coming to an end?
On a June evening in 1178, five British
monks saw the moons northeastern limb sprout a cloud of fire and hot coals. Their account was chronicled in the extensive records of another
monk named Gervase in Canterbury, England. Today, meteor scholars have identified this event with the 125,000-megaton explosion that carved the crater known as
Giordano Bruno at roughly 36° N, 102° E on the moons northeastern limb.
The study of craters began in 1609 when Galileo
Galilei pointed his modest telescope toward the moon. He quickly recognized that the circular areas he called spots were actually depressions.
As the moons phase changed, Galileo observed the raised crater rims catching the suns rays before the crater floors.
Nearly
60 years after Galileo looked at the moon, Robert Hooke published his book Micrographia. In it, he suggested two possible
origins for lunar craters, internal volcanic activity or impact from an external object. Though Hooke had experimented
with musket balls and mud in making impact craters, he believed that lunar craters probably had a volcanic origin. At that
time, interplanetary space was thought to be empty, and Hooke couldnt imagine where the impact objects came from.
Today,
we know that most of the moons surface formed more than three billion years ago when the solar system was heavily populated with asteroids. These remnants of the solar systems formation were swept up by
the planets and their moons. Earth was also hit many times, but water, life, and atmospheric and geologic processes have eroded
many of Earths craters until they are barely recognizable today. Because most of those processes do not affect the moon, its
surface has remained relatively unchanged since the end of the period of heavy cratering.
|

The moons surface formed more than three
billion years ago when the solar system was heavily populated with asteroids.
NASA
| | Impact craters are a natural lure for children. The spectacular way in which they form
spurs a childs imagination, while the features that result are easily spotted in the most modest equipment. Anyone can look
up at the full moon and identify its largest seas and craters. With a pair of binoculars, lunar mountain ridges, crater rims, and central peaks come into focus. Observing the moon is an ideal entry point into astronomy for children particularly because most notice its changing face at a very young age.
Crater
Characteristics
Begin your childs lunar lesson with some basic features. The moon holds craters, basins, mountains,
rilles, and rays. Each has its own attributes, but all are related to impacts in some way.
Lunar impact craters come
in three basic types: simple craters, complex craters, and basins. Simple craters are what most people think of when they
visualize a crater. They tend to be bowl-shaped with rounded or small, flat floors. Simple craters also have smooth rims that
lack terraces. As crater diameter (measured rim to rim) increases, the resulting features become more elaborate.
Complex
craters have scalloped inner walls that formed when unconsolidated rock slumped into the crater. Their most striking feature
is an uplifted central peak (or peaks) that protrudes from a broad, relatively flat floor.
Larger still are the so-called
impact basins. An interior ring characterizes this crater form, which has three divisions of its own. Central peak basins,
such as Compton, have a fragmented ring around a central peak, and they tend to be small. Peak-ring basins, such as Schrödinger
Basin on the south-southeastern limb, have a well-developed ring but no central peak. The largest of the crater types is the
multi-ringed basins. They generally are more than 250 miles (400 km) wide and can have as many as six concentric inner rings.
One of the best examples is Mare Orientale, the Eastern Sea.
|

Smaller craters are abundant and indicate an ancient
age for Mimas's surface.
JPL / NASA
| | The moon isnt the only place with a lot of craters. Some of the more complex ones exist
on other planets and moons. Jupiters moon Callisto is a heavily cratered world with one very prominent impact. The
Valhalla Basin has an extensive ring structure that surrounds the central crater. The entire ring basin measures nearly 1,900
miles across. Thats more than half of the moons 3,100-mile (5,000-km) diameter. If Valhalla were placed over the United States,
it would stretch just past our borders with Canada and Mexico.
Another scarred moon is tiny Mimas, which orbits Saturn.
Mimas is nicknamed the Death Star due to its resemblance to the Star Wars ship of the same name. A large impact crater
named Herschel spans one-third of the moons 240-mile (390-km) diameter. If the collision that formed this crater had been
much stronger, Mimas would have been shattered into pieces.
Creating Craters
If youre like me and didnt
get enough mud-pie time as a kid, try making a few crater pies of your own. Its guaranteed to be a hit with the kids. Youll
need an aluminum pie pan, a metal spoon, a paper cup, water, some fine clay-rich soil or drywall plaster, and newspapers to
protect the table and floor from stray impacts (better yet, try this out on the driveway).
Begin by placing some of
the soil in the pie pan. Be sure to break up any large clumps and remove all rocks, sticks, and other debris. Add water to
the soil, stirring as you go. Continue adding water until your concoction is the consistency of a very thick batter. If youre
using plaster, follow the package directions. You may have to add plaster gradually to the water youve placed in your pie
pan.
|
Once youve got the mixture to the proper
consistency, scoop a small portion into the paper cup and smooth the surface of the mixture in the pie pan. With your spoon,
scoop up a small glob from the cup. Stand above the pie pan and let the glob drop from the spoon. Now, if youre feeling particularly
impish, you can go back to your food-fight days and fling the glob from the spoon. Youll get extra points for actually hitting
the pie pan. For a more dramatic effect, sprinkle the smooth muddy surface with flour or light sand before making the craters.
This may help certain features, such as crater rays, stand out in your end product.
Continue making craters by varying
the size of the globs and the angle and velocity at which they hit the plate. Once the pan holds craters of different sizes
and shapes, let it dry out so you can study it.
Do all the craters have central peaks and raised edges? Are there
rays that lead away from the crater? What type of crater formed with a large glob that was dropped from the spoon as compared
to one that was flung from the spoon? How do craters formed by small globs differ from those formed by large ones?
You
can find the answers in your mud-pie moon.
|
Saturn at its Best
Take
time to view the planet best known for its majestic ring system.
by Carol Ryback

Through-the-telescope photography allows capturing
closeups of Saturn.
John Chumack
|
| Saturn is Decembers showpiece for observing. Nothing quite matches the feeling of beholding
it in a telescope for the first time yet it holds a certain fascination even for experienced observers. Watch for it in
the east/northeast as it rises about 45 minutes after sunset. Its easy to find: Just seek out the yellowish "star" that outshines
the other stars, except for Sirius and Canopus.
As the second-largest planet in the solar system, Saturn beats Earth in both diameter (75,000 miles, or nine times) and mass (95 times). It also trumps Earth with the speed of its rotation. In less than 11 Earth hours, Saturn spins all the way around. This may be aided in part by the fact
that gaseous Saturn has a density less than that of water: Theoretically, if you could find a bowl large enough, Saturn would float!
Instead,
this beauty appears to float in space, buoyed by its rings. At their fullest when the rings are tilted most toward our line
of sight they reflect more light than the disk of the planet itself. In Saturns 29 Earth-year-long journey around the sun,
the rings slowly change their orientation to us in a 14-year cycle. By 2009, Saturns rings will orient edge-on to Earth and
nearly disappear. However, the present tilt is large enough to reveal divisions in the rings. In September of 2001, Saturn
tilted its rings toward Earth roughly 26°, about the maximum possible. They will remain at this angle for the rest of the
year, providing an excellent opportunity to study their structural nuances.
As you gaze upon Saturn through a telescope,
you may notice a dark gap in the rings. The largest of these dark splits, the Cassini Division, separates rings A and B. It
was first noticed in the 17th Century by Giovanni Domenico Cassini. Another dark, thin line completely within the A ring is
known as the Encke Gap. The C ring also called the crepe ring is darker, and D darker still, and both are between the bright
B ring and Saturn itself. The remaining rings (labeled through G) are identified in their order of discovery rather than placement.
They are actually farther out from Saturn than the A ring and cannot be seen from Earth.
Astronomers believe this
dynamic ring system holds clues to the evolutionary processes of the solar system. Ring elements range in size from microscopic
particles all the way to kilometer-sized chunks (composed mostly of water ice). Pioneer 11 as well as the Voyager 1 and 2
probes during the late 1970s and early 1980s revealed a variety of structural features, such as sharp edges, arcs, waves,
clumps, and kinked and braided configurations. Occasionally, spokes may appear in the lighter B ring, caused by very small
particles (1 mm) that reflect light differently.
Observers should also watch for some of Saturns many moons, which
at last count stood at 30. Titan, the only known moon with a dense atmosphere, is half the size of Earth. Other large satellites include Rhea, Iapetus, Dione, Tethys, and Enceladus.
Smaller but still sizable are Hyperion, Phoebe, Janus, Epimetheus, Mimas, and Prometheus; all are difficult to observe from
Earth. Another of Saturns moons Pan is among those embedded in the ring system.
Any telescope that magnifies at least
30x provides a good view of Saturn, while views through instruments in the 4-inch to 8-inch range are often exquisite. Toward
the end of January, look for the shadow cast by the planet onto its rings, which creates a stunning 3-D quality to the display.
Only observers with high-resolution telescopes will get to enjoy features on Saturns cloud decks. If you are among the lucky, you may also
spot the pale equatorial region, a dusky equatorial band, and the darker polar regions. And if you experience excellent seeing conditions, you may even get a glimpse at Saturns belt system.
Equipment considerations aside,
anyone who makes the effort to catch a view of Saturn this month wont be disappointed. Its one of the most compelling sites
in the December sky.
|
It's Just a Phase
Use
the moon's changing face to teach a lesson in astronomy.
by Jeanette Brown
"Mommy, the moon ball is following us." I was two, bundled up in the backseat
of a car, craning my neck to peer out at the dark sky and the bright moon, which did indeed seem to go wherever we went. I
would be willing to wager that the toddler who thought the "moon ball" was following her and her mom hadn't yet looked up
to see that moon ball as just a sliver. . . . As I grew older, the moon's changing phase became harder to miss I stopped calling
it the moon ball and began to wonder just what I was seeing.
Because the moon is the easiest object to find in the night sky, most children
spot it without difficulty. So, what do you say when your child begins to notice the moon's changing phases and demands an
explanation? You'll do best to base it on the simple facts: The moon produces no light of its own the light we see is reflected
sunlight. As the moon circles our planet, once a month, the angle formed by the sun, Earth, and moon changes. It's this change
that produces the beautiful phases we see from Earth. New moon, first quarter, full moon, and last quarter are the four primary
phases. Waxing crescent, waxing gibbous, waning gibbous, and waning crescent are the intermediate phases. Does it soundconfusing?
It doesn't have to be.
Picture the scene in terms of a clock whose hands are moving backward.
In this imaginary world, the moon rests on the clock's hour hand, Earth sits at the clock's center, while the sun shines far
off in the direction of 12 o'clock. As the moon orbits counterclockwise around Earth, its position relative to the sun and
Earth changes, giving us the phases.
The first phase in the lunar cycle is new moon. At this point in its orbit,
the moon is positioned between the sun and Earth at 12 o'clock. From Earth, the sun and moon appear to be in the same part
of the sky and will rise and set together. The side of the moon that receives the sun's light is facing away from Earth, so
no moon is visible.
One day after new moon, a faint sliver can be seen low on the western horizon
at sunset. The phase has moved from new to a waxing crescent. As the moon continues in its counterclockwise orbit, the crescent
grows larger, or waxes. One week later, the moon reaches its second primary phase, first quarter. Accordingly, the moon has
moved one quarter of the way around Earth.
At first quarter, the moon sits at 9 o'clock. The sun, Earth, and moon
form a right triangle, and half of the moon's disk is illuminated. At first quarter, the moon rises 6 hours after the sun
at about noon. It reaches its highest point at sundown and sets around midnight. That means the moon can be seen during daylight
hours in the afternoon.
For several days after first quarter, the moon continues to wax but is
a waxing gibbous phase instead of a waxing crescent. A gibbous moon is more than a quarter moon but less than a full moon.
During this phase, the moon moves from 9 o'clock to 6 o'clock on the dial, and the sun-Earth-moon angle is getting larger
just like the moon's phase.
When the moon reaches its 6 o'clock position, the phase is full. The side
of the moon that faces Earth is fully illuminated that large circle of light a certain two-year-old child called the moon
ball. On the clock, the sun, Earth, and moon form a straight line. From Earth, the sun and moon appear to be at opposite ends
of the sky. So as the sun sets, the moon rises. The big moon ball is visible all night.
Once it's past full, the moon moves from 6 o'clock to 3 o'clock and the
sun-Earth-moon angle begins to shrink. The moon's phase is also getting smaller. It's moving from waning gibbous to its third-
or last-quarter phase. A third-quarter moon sits at 3 o'clock on the phase dial, where the sun-Earth-moon angle is once again
90°. From Earth, we see half of the moon's disk illuminated the side opposite as the one illuminated at first quarter. A third-quarter
moon rises about six hours after the sun sets, reaches its highest point in the southern sky at dawn, and sets at about noon.
 |

|
| |
As the moon orbits Earth its position relative to the sun and Earth changes.
This causes the lunar phases we see in our sky.
|
In the week after third quarter, the moon moves through its waning crescent
phase and eventually returns to new where the cycle begins again. So, there are the facts. And your two-year-old may be precocious
enough to understand the concept right off the bat. My very proud momma swears that I would have been.
Precocious or not, two years old or twelve, your child (or class) stands
a much better chance of understanding if you show rather than tell. Here are a couple of activities to teach the moon's phases
in a hands-on way that won't be hard to grasp. They allow an individual to discover the moon's phases and the physical process
that determines them.
Let's start with an easy, no-frills activity that develops observational
and record-keeping skills. For each child, you'll need nothing more than a pencil, a large one-month calendar, and a firm
writing surface. In advance, draw a circle in each day's square on the calendar. During the activity, kids will fill in these
circles to correspond to the moon's shape on each successive day. Teachers in particular will want to begin the activity during
a first-quarter phase, when the moon is visible in the afternoon sky. This way, students can develop their skills during school
hours and put them to use at home later in the cycle, when the moon is in the night sky.
When you've determined a good day to begin the activity, take the kids
outside and distribute materials. One tip: It helps to give the calendar an official-sounding name, something like "Lunar
Observation Chart." Doing so will serve to make the kids feel excited and important while reminding them that they are performing
a scientific observation.
With charts and pencils in hand, head outside and locate the moon. Record
the date and time and shade in the day's circle to correspond with the moon's phase. As more of the chart is completed, you
can explain the names for the various phases and encourage kids to add them on the appropriate days.
Activity two puts the moon on a stick. This activity is designed to show
why the moon has phases. Again, the materials are few and inexpensive, and the activity is well suited for either a single
child or an entire class.
First, gather your materials. You'll need a clear 100-watt light bulb,
either a lamp stand with its shade removed or a light clamp, a large room that can be darkened for the demonstration, pictures
of the moon at its four primary phases (the Lunar Observation Chart will also work), and one Styrofoam ball and one sharpened
pencil per child.
As classroom pencils are no longer made of lead, poisoning is not really
a concern. But injury is, so you may want to push the balls onto the pencils yourself, rather than assigning that task to
the kids. That done, place the light in the center of the room and have the children stand in a circle around it (again, this
works just fine with one child too). Distribute a "moon on a stick" to each child, darken the room, and instruct the children
to hold their moons above their heads so that the side of the ball facing them is in shadow. That is, the ball is between
the child and the light source.
Explain to the children that the ball is the moon, the light is the sun,
and the child's head is the Earth. Then have them turn slowly counterclockwise, stopping every quarter turn to observe the
shadow on the ball. By consulting their charts or the pictures you provide, each child should be able to identify the various
moon phases as modeled on the Styrofoam balls.
Begin slowly, starting with the primary phases and check to see that everyone
is catching on. Once they comprehend the basic process, have a little more fun with it. Call out a phase and see who can find
the position in the "moon's" orbit where that phase is visible. Or up the ante a little and ask to see a gibbous moon or a
crescent moon. You could even have them circle around crooning "waaaaxing" until suddenly they pass full and the cry changes
to "waaaaaning." Just don't let them get too dizzy...or have a supply of paper bags on hand as well!
|
The Northern Hemisphere
The Inuit are
among those groups of people whose means of survival is solely dependent on hunting and fishing. For them, the cycle of the
sun and moon are of great importance in shaping the celebrations and survival of this culture.
One Inuit culture,
the Igloolik, call the far northern latitude of 69° 22N home. Here the sun falls below the horizon on November 29 and is not seen again until January
14. Summer months offer the opposite scenario. For the 60 days between May 19 and July 24, the sun is above the
horizon constantly. During the summer months, it was important for the Igloolik to track the altitude of the sun to determine how long it was before the dark days of winter were once again upon them.
At high northern latitudes, the sun is above the horizon every day
for 24 hours during the summer. Our star reaches its highest position in the sky on the summer solstice and would become progressively lower and lower as winter approached.
The time of the suns return
after the dark days of winter signaled a renewal of food and festivities for the Igloolik. The Igloolik had very interesting
means of observing the suns return and measuring its altitude. They identified three different stages, each signifying something
of importance to the Igloolik culture. The first stage of the suns return was observed when a harpoon shaft held horizontally
at arms length at noon would fit between the horizon and the lower rim of the suns disk. This indicated that the sun was barely
back on its return. The second stage was observed when you extended your arm and the width of your mitted thumb would fill
the gap between the sun and the horizon. This stage signaled the start of seal hunting. The final stage of the suns return
was marked when the full width of your mitted hand could fill the gap between the sun and the horizon. This observation occured
when the sun had reached its highest altitude above the horizon. It marked the end of winter, and the time when catching marine
animals would be easier.
|
This description of how a simple means for measuring
the suns altitude was used by the Igloolik to determine their seasonal changes and hunting periods, could help to illustrate
to students that the they do not necessarily need complex or high-tech instruments to make simple informative observations
of the sky or to track the changing position of celestial objects. The method illustrated below has been known to be quite
handy for estimating the angle of sky object above the horizon.
|
Activity: Measuring the Position of the sun in the
Sky
Note: For safety reasons, you may choose to have students measure the position of the moon in the sky instead
of the sun.
Purpose: To give students the opportunity to measure the position of the sun in the sky using simple
tools and methods.
Materials: a hand (preferably, your own)
Procedure:
NOTE: Review
safety procedures for observing the sun DO NOT LOOK DIRECTLY AT THE SUN OR OBSERVE ALONE IN AN ISOLATED OR OTHERWISE UNSAFE
LOCATION
a) Read the Inuit example above to students.
b) Define horizon as the line along which the sky
and land appear to meet.
c) Choose one part of the horizon to observe. Try to choose one with landmarks, to give students
a common reference point.
|
d) Have them stretch out their arm and make a vertical fist (see the illustration at
right), while looking directly at the horizon. Two imaginary lines, one running along their arm and one running from their
neck to the top of their head, should make a 90 degree angle.
e) This discussion provides a good opportunity to review geometry terminology, since the
bottom of the fist on the horizon to the top of the fist makes an angle of ten degrees.
f) Have students count how
many fists they can fit between the horizon and the bottom of the suns disk.
If you decide to to make further observations,
remember to discuss the importance of keeping variables constant. For instance, the time of day and the place from which they
measure the angle and position of the sun should be the same. Alternatively, you may have students devise their own methods
of relative measurement and apply them to measuring the position of the sun in the sky.
|
The Southern Hemisphere
The New Zealand
Maori display their understanding and observations of the connection between the solstices, the seasons, and the position
of the sun in the sky in the following story"
During the year the sun roams from Rangi's head to his toes and back
again. Rangi is the sky, and when the sun is near Rangi's head it is summer in New Zealand. The Maori also say that the sun
is spending time with the Hine-raumati, the Summer Maid. He leaves her in December, around the time of the summer solstice
to go and live with Hine-takurua who is the Winter Maid. The sun enjoys the company of Hine-takura until the June solstice,
when it's time for him to head back to the land. There the Summer Maid is cultivating crops and preparing forest game for
the summer hunt.
Two things should be highlighted in this story. First, the position of the sun changes from high
to low in the summer and winter respectively. Second, children should note that the months of summer and winter in New Zealand
are opposite to those of the Northern Hemisphere. In the Northern Hemisphere, the summer months are June to August. In the
Southern Hemisphere, the summer months are December to February.
NOTE: Many children have deep misconceptions about
the suns motion in the sky, this story requires some discussion about how Earths rotation is the cause of the apparent motion of the sun.
|
Activity: The Sun and the Seasons at Different Latitudes
Purpose: To understand the difference between seasons and the position of the sun in the Northern and Southern
Hemispheres.
Procedure:
1. Read the Maori story to students.
2. If time allows, have your students
observe the position of the sun in the sky over the course more than one season. If time is limited, they may observe the
changing position of the sun with planetarium software or under a planetarium's dome.
3. Have students rewrite the
Maori story to apply to the observation of the sun and the seasons in the Northern Hemisphere. |
|